
Building a timber frame greenhouse can transform your gardening experience. Imagine stepping into a space that not only enhances the beauty of your garden but also protects your plants. Timber frame joinery in greenhouses offers several benefits, such as natural insulation that keeps your plants cozy and a traditional look that blends seamlessly with your landscape.
Here’s a quick look at some advantages:
Benefit | Description |
|---|---|
Aesthetic Appeal | Timber frame joinery in greenhouses provides a traditional look that blends well with garden landscapes. |
Insulation Properties | Wood provides natural insulation, maintaining a stable temperature ideal for plant growth. |
Durability | Timber frame structures are stable and can withstand extreme weather conditions. |
Cost-Effectiveness | Wooden greenhouses utilizing timber frame joinery are often more affordable in terms of materials and maintenance. |
Environmental Appeal | Timber is a renewable resource, making it an eco-friendly choice for greenhouse construction. |
Ease of Expansion | Timber frame joinery allows for larger spaces with fewer supports, facilitating easier expansion of the greenhouse. |
With this guide, you can build your dream greenhouse and enjoy the fruits of your labor.
Key Takeaways
Building a timber frame greenhouse enhances your garden’s beauty while providing natural insulation for your plants.
Choose durable timber like cedar or redwood for longevity and resistance to decay in your greenhouse structure.
Use essential tools like hand saws and drills to ensure precise cuts and efficient assembly of your greenhouse.
Plan your greenhouse layout carefully to maximize space and ensure easy access for planting and maintenance.
Regular maintenance, including inspections and cleaning, is crucial for keeping your greenhouse in top condition and your plants thriving.
Materials for Greenhouse Build
Building a greenhouse requires careful selection of materials to ensure durability and efficiency. Let’s dive into the essential components you’ll need for your greenhouse build.
Timber Types
Choosing the right timber is crucial for your greenhouse structure. Here are some popular options:
Cedar: Known for its natural resistance to decay, cedar is a favorite among gardeners. It lasts around 15 to 25 years above ground and can endure even longer with proper care.
Redwood: Similar to cedar, redwood offers excellent durability and aesthetic appeal. It can last up to 30 years or more.
Pressure-Treated Pine: This is a cost-effective option that can last 15 to 25 years. It’s treated to resist rot and insects, making it suitable for outdoor use.
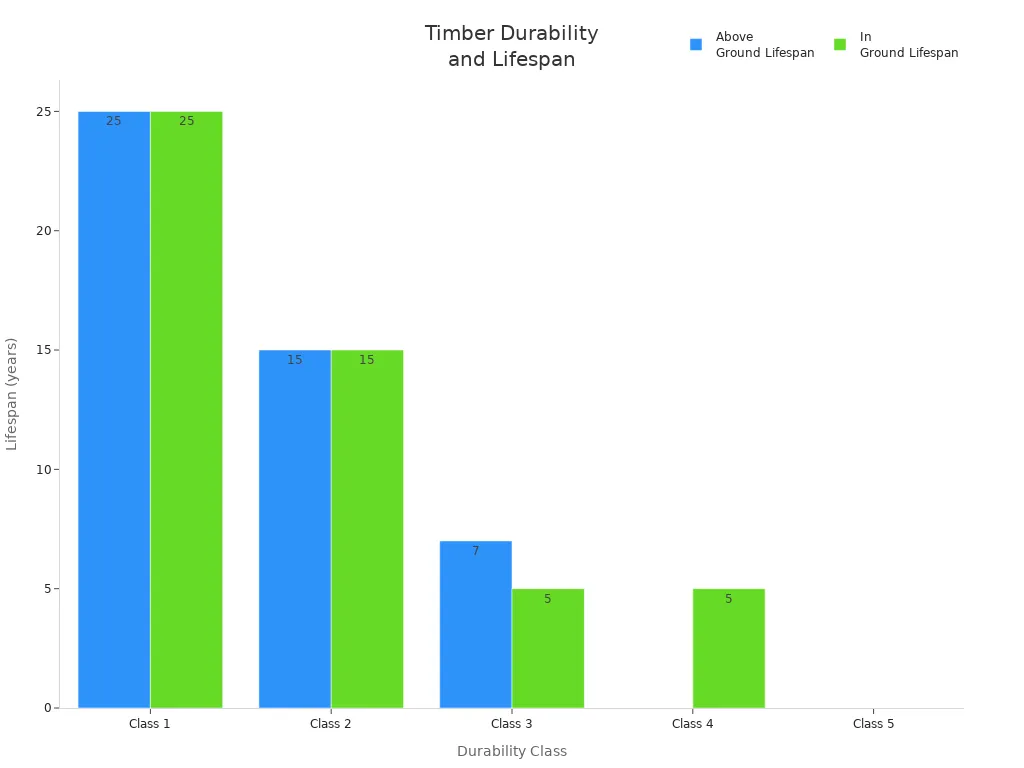
Here’s a quick comparison of the durability of different timber species used in greenhouse construction:
Durability Class | Lifespan (Above Ground) | Lifespan (In Ground) |
|---|---|---|
Class 1 | 25+ years | 25 years |
Class 2 | 15-40 years | 15-25 years |
Class 3 | 7-15 years | 5-15 years |
Class 4 | 0-7 years | 5 years |
Class 5 | 0-5 years | N/A |
Fasteners and Connectors
To ensure your greenhouse frame remains sturdy, you’ll need reliable fasteners and connectors. Here are some recommended types:
Type of Fastener/Connector | Description |
|---|---|
Dowel-type fasteners | Includes bolts, lag bolts, nails, screws, and studs that distribute load through the depth of the wood. |
Shear connectors | Includes split rings, shear plates, and metal connectors that distribute load across the contact surface. |
Truss connector plates | Made from thin galvanized steel, used for joining lumber in prefabricated light-frame roof trusses, rust-resistant. |
Joist hangers | Used to create joints for softwood and structural composite lumber, mass-produced from galvanized steel. |
When selecting fasteners, ensure they can withstand forces like wind and seismic activity. They should also handle pullout, pull-through, and stripping forces to maintain the stability of your greenhouse structure.
Glazing Options
The glazing material you choose affects light transmission and insulation in your greenhouse. Here are some popular options:
Double Pane Glass: This option provides high insulation value and can significantly reduce heating costs compared to single-pane glass.
Multi-wall Polycarbonate: This material diffuses sunlight and reduces hotspots, making it ideal for plant growth. It offers similar insulation benefits to double-pane glass.
Here’s a comparison of the insulation values and costs of different glazing options:
Glazing Option | Insulation Value | Energy Efficiency Comparison |
|---|---|---|
Double Pane Glass | High | Offers half the heating costs of single pane glass. |
Multi-wall Polycarbonate | Similar | Diffuses sunlight and reduces hotspots for plants. |
When considering costs, double-wall polycarbonate panels typically range from $1,000 to $2,000, while thermal glass panels can cost between $2,000 and $3,000.
By carefully selecting your timber, fasteners, and glazing, you’ll create a greenhouse that not only looks great but also functions efficiently for years to come.
Tools for Timber Frame Joinery

When you embark on your journey to build a timber frame greenhouse, having the right tools is essential. Let’s explore the tools you’ll need to make your project a success.
Essential Hand Tools
You’ll want to gather some key hand tools for precise work. Here’s a list of must-haves:
Layout Tools: These help you measure accurately. Grab a framing square, combination square, tape measure, and angle finder.
Hand Saws: Consider using Japanese pull saws or standard push stroke saws for various cutting tasks.
Chisels: Framing chisels, including corner chisels and firmer chisels, are crucial for joinery work.
These tools will help you achieve clean cuts and accurate measurements, making your timber frame joinery easier and more effective.
Power Tools
Power tools can speed up your work and improve accuracy. Here are some essential power tools to consider:
Circular Saw: Perfect for making straight cuts in large pieces of timber.
Drill: A cordless drill is invaluable for making holes and driving screws.
Jigsaw: Use this for cutting curves and intricate shapes in your timber.
Investing in quality power tools will save you time and effort as you build your greenhouse.
Safety Equipment
Safety should always come first. Here’s a list of recommended safety equipment to protect yourself during construction:
Wear personal protective equipment (PPE) to prevent injuries.
Use protective glasses to shield your eyes from debris.
Wear a hat to protect against falling objects.
Use protective clothing to cover your arms and legs.
Wear leather gloves to safeguard your hands and fingers.
By prioritizing safety, you can enjoy the process of building your greenhouse without unnecessary risks.
Preparing to Build a Greenhouse
Before you dive into building your greenhouse, take some time to plan. Proper preparation can make a big difference in how well your greenhouse performs. Here are some key areas to focus on.
Design Considerations
When designing your greenhouse, keep these factors in mind:
Location: Choose a site that maximizes sunlight exposure, ideally south or southeast-facing.
Size: Align the greenhouse size with your gardening goals and available space.
Materials: Select durable materials for the frame and covering, such as wood, metal, or polyethylene.
Ventilation: Incorporate systems to regulate airflow and prevent overheating.
Irrigation: Implement efficient water management systems like drip irrigation.
Structural Stability: Ensure a solid foundation and frame to withstand local weather conditions.
These considerations will help you create a greenhouse that supports healthy plant growth and is easy to maintain.
Site Selection
Selecting the right site for your greenhouse is crucial. Here are some tips to guide you:
Position the greenhouse in an area with at least 6-8 hours of direct sunlight daily.
Orient the structure with its longest side facing south or southeast to maximize light absorption.
Avoid areas prone to waterlogging to prevent structural issues and mold growth.
Choose a slightly elevated site with good drainage.
Consider how terrain, landscape, and structures block sunlight. Use a sun path chart to determine potential shading from trees or buildings.
By carefully evaluating these factors, you can ensure your greenhouse gets the sunlight it needs while avoiding drainage problems.
Layout Planning
A well-planned layout can enhance your greenhouse’s efficiency. Here are some best practices:
Efficient Planting Areas: Design your layout with shelving and benches to maximize planting space and ensure proper plant spacing.
Accessibility and Mobility: Ensure pathways are wide enough for easy movement and that work areas are accessible.
Workspaces and Utility Areas: Include dedicated spaces for potting, tool storage, and water access to streamline workflow.
Plant Arrangement and Crop Rotation: Plan for the needs of different plants and implement crop rotation to maintain soil health.
Avoid overcrowding by leaving space between plants for airflow and maintenance. Also, remember to utilize vertical gardening techniques to maximize your growing area.
With these preparations, you’ll be well on your way to building a successful greenhouse that meets your gardening needs.
Construction Steps
Preparing the Site
Before you start building your greenhouse, you need to prepare the site properly. This step is crucial for ensuring a stable and functional structure. Here’s how to get started:
Clearing the Land: Remove any debris, rocks, or vegetation from the area. This gives you a clean slate to work with.
Leveling the Ground: Make sure the ground is level. This prevents water from pooling inside your greenhouse, which can lead to mold and other issues.
Installing a Drainage System: Proper drainage is essential. It helps avoid water accumulation around the greenhouse, keeping your plants healthy.
To create a solid foundation, consider these effective methods:
Gravel or Crushed Stone: This provides good drainage and stability. Lay a thick layer for a firm foundation.
Concrete Piers: These reduce the amount of concrete you need. Place them under load-bearing areas for support.
Treated Wood Frame: This is an economical choice using pressure-treated lumber. Just make sure it’s level and anchored.
Reclaimed Materials: Using local resources like bricks or blocks can save costs and add character to your build.
Building the Frame
Once your site is ready, it’s time to build the frame. This is the backbone of your greenhouse, so you want to get it right. Start by measuring and cutting your timber according to your design. Use a framing square to ensure your angles are accurate.
As you assemble the frame, consider using reliable joinery techniques. Here’s a quick overview of some effective methods:
Joinery Technique | Strengths | Applications |
|---|---|---|
Kneebrace Joinery | Provides rigidity and resists wind loading due to its triangular shape. | Critical for timber frame strength. |
Timber Sill Joinery | Ties the structure together and adds strength over seasonal movement. | Used in foundations for stability. |
Half Lapped Scarf Joinery | Resists tension, compression, and shear forces; reinforced with steel. | Joins timbers for longer beams. |
Tongue and Fork Joinery | Extremely precise and strong; eliminates the need for a ridge pole. | Used for rafter connections. |
Wedged Anchorbeam Tenon Joinery | Resists outward thrust; tightly secured with wedges. | Supports roof systems. |
Dovetail Joinery | Adds character and strength; allows for flush joist placement. | Used in floor joists and wall purlins. |
These techniques ensure your frame is sturdy and can withstand the elements.
Joining Techniques
When it comes to joining your timber, you have several options. Each method has its strengths, so choose the one that best fits your design and needs. For example, mortise and tenon joints are among the strongest, providing a secure fit. Dovetail joints offer a unique interlocking shape, while tongue and fork joints are known for their durability.
Adding Glazing
After your frame is complete, it’s time to add glazing. This step is vital for allowing sunlight in while protecting your plants from harsh weather. Follow these procedures for effective installation:
1. Use silicone sealant or weatherproof adhesive to secure glass panes firmly within their frames. This prevents rattling or dislodging during strong winds. 2. Install diagonal braces or tension wires across the corners of the frame. This increases rigidity and helps distribute wind forces evenly. 3. Use ground anchors or stakes to secure the greenhouse to its foundation. This enhances stability against weather conditions. 4. Inspect for gaps and use caulk or weather stripping to seal these areas. This prevents wind from entering and keeps your greenhouse cozy.
Finishing Touches
Finally, don’t forget the finishing touches! These details can enhance both the functionality and appearance of your greenhouse. Here are some effective treatments to protect your timber frame:
Treatment Method | Description | Benefits |
|---|---|---|
Pressure-Treated Wood | Wood is placed in a tank where preservatives are forced deep into the fibers under pressure. | Robust protection against decay and insects. |
Thermal Modification | Wood is heated in the absence of oxygen, altering its structure for better moisture resistance. | Increased resistance to moisture, decay, and warping. |
Acetylation | Changes wood’s chemical structure to improve stability and reduce swelling. | More dimensionally stable, less prone to swelling and shrinkage. |
Coating Systems | Modern coatings provide a physical barrier against UV rays, moisture, and biological agents. | Enhances aesthetic appeal while protecting against environmental threats. |
By taking these steps, you’ll ensure your greenhouse not only looks great but also stands the test of time. Now, you’re ready to enjoy your new space and start growing your dream garden!
Interior Setup and Maintenance
Creating an efficient interior setup in your greenhouse can significantly enhance your gardening experience. You want to make the most of your space while ensuring your plants thrive. Here are some essential features to consider:
Interior Features
Incorporating shelves and organization systems can boost productivity in your greenhouse. Here are some features to think about:
Shelving: Install sturdy shelves to maximize vertical space. This allows you to arrange your plants efficiently and makes it easier to access them.
Irrigation Systems: Efficient watering is crucial for plant health. Consider a drip irrigation system that delivers water directly to the roots, minimizing evaporation. You can also use timers and sensors to automate watering schedules.
Mobile Containers: Use mobile containers for easy rearrangement of crops based on their growth stages. This flexibility helps you adapt to changing needs as your plants grow.
Seasonal Care
Maintaining your greenhouse throughout the year is vital for its longevity. Here’s a checklist of seasonal care practices:
Inspect the Frame and Base: Regularly check for damage, leaks, and ensure proper joint alignment.
Check for Rot and Damage: Look for signs of rot and secure any loose joints.
Scrub and Caulk Wooden Frames: Clean the frames and seal any cracks to prevent pests.
Paint or Stain in Summer: Apply protective coatings to shield the wood from UV rays.
Keep Polycarbonate Panels Clean: Regularly clean panels to ensure maximum light penetration.
Reduce Humidity in Summer: Open vents and windows to improve air circulation and lower humidity levels.
By following these steps, you can maintain a healthy environment for your plants.
Repairing Damage
Even with proper care, damage can occur. Here are common issues and recommended repair methods:
Structural Issues: Address damaged frames or broken glazing promptly to prevent further damage.
Incorrect Materials: Use UV-resistant glazing and durable framing materials to maintain integrity.
Poor Ventilation: Ensure proper sizing and positioning of ventilation systems for adequate airflow.
Drainage Problems: Maintain functioning drainage systems to prevent water pooling.
Regular inspections and timely repairs will help prolong the life of your greenhouse and keep your plants thriving.
Building your timber frame greenhouse can be a rewarding experience. Here’s a quick recap of the key steps to get you started:
Prepare the area and cut base timbers to create a rectangle.
Secure the timber frame base to the ground.
Assemble the side walls and attach them to the base.
Fit timber sole plates and secure support posts for the end walls.
Install ridge posts and temporary cross braces for stability.
Create a template for rafters and install them.
Construct the door and secure it in place.
Add extra timber lengths for stability at the back.
Now that you know how to build your greenhouse, it’s time to take action! Imagine the joy of nurturing your plants and watching your garden flourish. Start your project today and enjoy the many benefits of gardening!
FAQ
What is the best timber for building a greenhouse?
Cedar and redwood are excellent choices due to their natural resistance to decay. Pressure-treated pine is also a cost-effective option that lasts well outdoors.
How do I ensure proper ventilation in my greenhouse?
You can install roof vents, side vents, or use exhaust fans. This helps regulate temperature and humidity, creating a healthy environment for your plants.
What are the benefits of using polycarbonate glazing?
Polycarbonate glazing diffuses sunlight, reducing hotspots while providing good insulation. It’s lightweight, durable, and offers excellent protection against UV rays.
How often should I maintain my greenhouse?
Regular maintenance is key! Inspect your greenhouse at least once a month. Check for leaks, clean the glazing, and ensure ventilation systems work properly.
Can I expand my greenhouse later?
Absolutely! Timber frame joinery allows for easy expansion. Just ensure your initial design accommodates future growth, and plan for additional materials.
